

blur the background in photoshop
A cleverly applied blur can give images a special quality that enhances focus, movement, or fosters a dreamlike, ethereal mood.
Let's look at three easy techniques for enhancing your images with blurring in Adobe Photoshop, as well as tips for how to achieve a similar look using free software.
Whether you want to direct the viewer's focus onto the subject of an image, create an ethereal bokeh effect, or give a portrait image dreamy, vintage appeal, you'll find a simple tutorial here to achieve your desired look.
Three Easy Techniques for How to Blur Photos in Photoshop
An image that's partially or entirely blurred instantly appears more ad-hoc and effortless than its sharpened counterparts. Blurring techniques are perfect for giving your images a street-style effect, injecting the image with movement and dynamism.
Blurring also replicates the effect of vintage photography styles, which were often the result of slower shutter speeds or a purposefully applied soft focus effect (the latter was often achieved by smearing petroleum jelly onto the camera lens).
Here, you'll find three mini-tutorials for creating beautiful blur styles in your images, each of which gives an image a particular effect:
- How to Apply a Field Blur Effect: A good suits-all technique for improving focus and balance in your images.
- How to Apply a Bokeh Blur Effect: This technique blurs any light source(s) in your image, creating an ethereal effect perfect for after-dark scenes.
- How to Apply a Vintage Blur Effect: Inspired by the dreamlike style of images from the 1970s, this technique is particularly effective for giving portrait shots an Instagram-friendly soft focus effect.
What You'll Need to Create a Blur Effect in Your Images
We'll be using Photoshop to create each of these three effects, which allows optimum control over the type and scale of the blur effect. However, you can also achieve similar effects using free online software such as Shutterstock Editor. Skip to the end of the article to discover how to apply instant and effective blur techniques to images using Editor.
- How to Blur Your Images Instantly using Shutterstock Editor: A Quick-Start Guide
1. How to Apply a Field Blur Effect in Photoshop
Field blur applies a general blur effect across the entirety of an image. It can soften overly-sharp photos or, as we'll do here, to bring focus to the foreground or main subject. It's the easiest technique you can do and incredibly effective.
Step 1
Select an image that will allow you to create contrast between a blurred and focused area. The simplest type of photo is one that features a background with depth and a subject in the foreground, such as this image of a hiker (below) overlooking a landscape.
Duplicate the Background layer to preserve a copy of your original image.

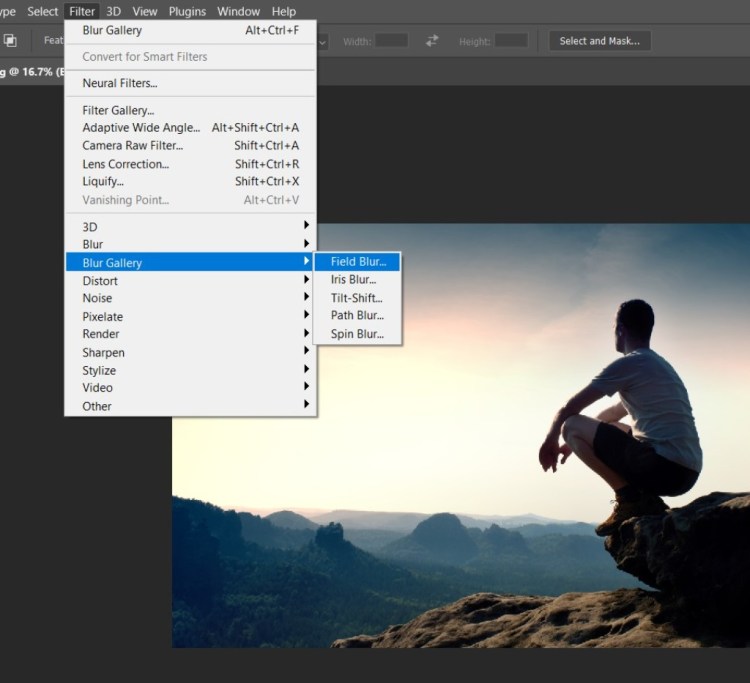
On the top menu, go to Filter > Blur Gallery > Field Blur.
Step 2
Field Blur allows you to click-and-drop pins onto areas of your image, allowing you to control the amount of blur on each area.
Begin by dropping a point onto the area (or areas) you want to remain in sharp focus. In this case, the man sitting on the cliff in the foreground.
Under the Field Blur section, move the Blur slider down to 0 px. I also want the cliff in the foreground to remain in focus, so I drop pins across this area, setting this to 0 px, as well.

Step 3
Drop more pins across the areas you want to blur. In this example, the forested landscape in the background. Adjust the level of Blur until you're happy. Between around 15 and 25 px will create a subtle blur on any areas of detail, without distorting the image too much.
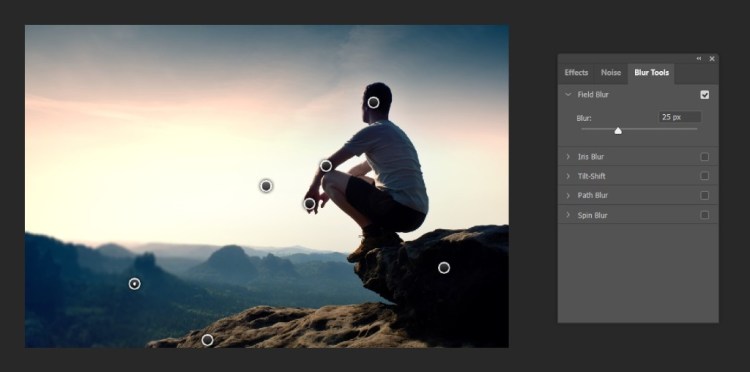
A higher level of blur can be applied to areas with less detail, such as the sky. Here, I increase the level of Blur to 137 px to create a diffused, glowing effect.

Step 4
When you've finished applying the Field Blur, check the High Quality box at the top of the workspace, then click OK.

Your quick and easy Field Blur effect has helped to bring the foreground into greater focus, making the subject the focal point of the image.

2. How to Apply a Bokeh Blur Effect in Photoshop
This is a wonderful technique for softening images, making them feel ethereal and slow-moving. Bokeh is an effect that selectively applies blur to parts of your image, leaving others in focus. It's best in photos that feature light sources in the background or surrounds the subject, such as lamps or candle flames. It can also be used to soften the vibrancy of light that would otherwise distract from the main subject, such as neon store signs or phone lights.
Step 1
Choose an image that contains one or numerous light sources in the background—lamps, bulbs, signs, or candles. This next image is perfect as we can use the bokeh blur effect to bring the focus onto the trio of people, simultaneously creating an intimate, ethereal effect across the photo.
Open the image in Photoshop, then duplicate the layer to preserve a copy of the original image.

Step 2
First, we need to isolate the background—which we will apply the blur effect to—from the subject, which we want to keep in focus.
Select the background using the Lasso Tool (L). If there are separate sections of background, hold Shift while you trace around the different areas.
Then, click on Select and Mask in the top Controls panel.
Under the Edge Detection section, check Smart Radius and adjust the Radius slider until you create a more accurate selection of your background. When you're happy with the result, click OK.

Step 3
Copy and Paste the selection, creating a new layer. Rename this Background Bokeh.

Step 4
Now, it's time to create your beautiful bokeh effect! Go to Filter > Blur Gallery > Field Blur.

There are two sections that will allow you to edit your bokeh effect. First, the Blur slider under Field Blur in the Blur Tools panel. Alongside this, you can adjust the amount of light and color in your effect by clicking the Effects tab in the same group of panels.
Under Field Blur, set the Blur to around 30 px.
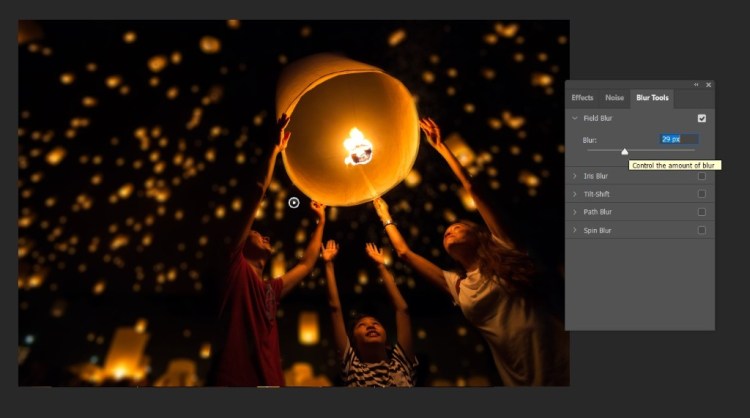
From the Effects panel, increase the Light Bokeh until you have achieved the desired amount of glow. By moving the Bokeh Color slider, you can introduce a wider spectrum of colors into the effect.

Once you're happy with the effect, check the High Quality box in the top Controls panel before clicking OK.

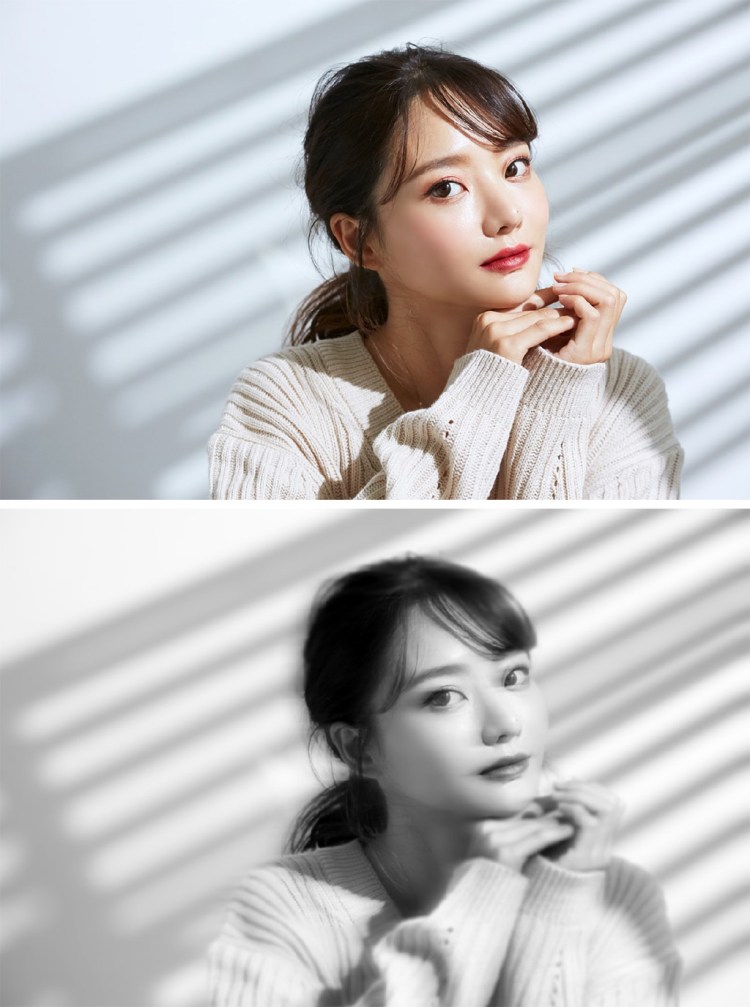
3. How to Apply a Vintage Blur Effect in Photoshop
Looking to give portraits a dreamlike, vintage effect? This ultra-quick technique mimics the drag effect achieved by a slow shutter speed, surrounding your subjects in a haze that looks fantastic in beauty imagery or informal portrait shots.
Step 1
Open your chosen image in Photoshop. Portraits, such as this one, are the best format for this style of blur effect. But, you can also apply it successfully to product shots or animal portraits, to create a dreamy, retro effect.
To make sure any destructive filters don't damage your original image, duplicate the Background layer. Click onto the copied layer to work on it going forward.

Step 2
Then, go to Filter on the top control panel, and choose Blur Gallery > Iris Blur.

Move the oval lasso that appears so that it's placed over the face of the subject, allowing the outer edges of the image to blur, but not the facial features.
Bring the level of the Blur down to about 15 px, so that the outer blur blends seamlessly into the center of the portrait.


Step 3
In the Field Blur tab, increase this to around 7 px, to apply a low level of blur across the whole image.

Step 4
From the Path Blur options at the bottom of the Blur Tools panel, switch Basic Blur to Rear Sync Flash. You'll see the whole image slightly shift to the right, mimicking the style of a slow shutter speed.
Increase the Speed to about 90% and set the Taper to around 16%.
Check the Edit Blur Shapes box, and increase the End Point Speed to around 90 px.
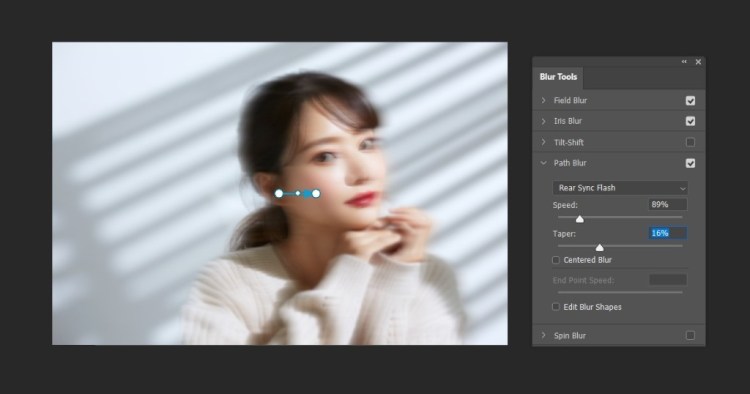
With the Edit Blur Shapes box checked, you'll also notice that the arrowed line on the image is given more nodes. By pushing and pulling these nodes, you can adjust the direction of the blur. Try to enhance the direction of existing elements in your image by adjusting the nodes.
For example, in this image, the shadows in the background and the subject's face are orientated diagonally, so I can move the blur's direction to match this.

Step 5
To the top-right of the workspace, you can find the Motion Effects panel. In this panel, increase the Strobe Strength to about 50% and keep the Strobe Flashes to 1, to avoid distorting your image too heavily.

Step 6
In the top control panel, check the High Quality box and click OK. Photoshop will process the effects you've applied and return you to your original two layers.

Top tip: Want to make your images appear a little more vintage? Add a Channel Mixer adjustment layer, and check the Monochrome box. This, in combination with the Blur effect, gives an image a 1940s movie star style that's classic and timeless.

How to Give Images a Blur Effect Using Free Software
You don't need to splash out on Photoshop to give your images a dreamy blurred effect. Shutterstock Editor is a free online app that allows you to prepare images for using online or downloading to your computer. Here, discover a simple three-step tutorial for blurring your images using Editor. Why not give it a try?
Step 1
Go to Shutterstock Editor and create a new canvas of any size (you can always expand or crop the canvas to fit your chosen image later).
Click on the Images icon at the top of the left-hand toolbar. Search for an image from the entire Shutterstock library or, if you have a particular image in mind (such as this image of a hiker I'm using here), paste its ID number into the search bar.
Click on the image to drop it onto the canvas.

Step 2
With the image selected, click on Effects at the top of the workspace, then click on Remove background in the side panel that opens.
With Remove background checked, and the Brush Size set to around 20, click onto the background of the image to select it gradually, leaving most of the main subject in the foreground not selected.
Then, click the Remove background red button.


Step 3
This isolated part of the image will be the area that remains in focus. To replace the deleted background, return to the Images icon and drop the same image onto the canvas again, making sure the position of the two images align (the app should do this automatically for you).
Right-click on this newly-inserted image and choose Move to back.

With this image still selected, click on Effects and move the Blur slider at the bottom to around 10. This will blur the image in the background, preserving the sharpness of the cropped image in the foreground.

Click on Share or Download at the top-right of the workspace to share your image to social media or save to your computer. Great job!

Eager for more Photoshop tips? Post-editing allows you to bring out the best in your images, and it can be fun, too! Discover more Photoshop tutorials, tips, and templates from across the Shutterstock blog:
- How to Change the Color of Absolutely Everything in Photoshop
- How to Resize an Image in Photoshop Without Losing Quality
- Surreal Compositions: How to Blend Images in Photoshop
- How to Whiten Teeth in Photoshop + More Retouching Tips
- Create and Customize a Tie-Dye Pattern in Photoshop
Cover image by contributor rdonar.
blur the background in photoshop
Source: https://www.shutterstock.com/blog/how-to-blur-background-photoshop-bokeh-effect
Posted by: lambrightposix1941.blogspot.com
0 Response to "blur the background in photoshop"
Post a Comment